What programs do I use to edit the registry?
Windows comes with one to three different registry editing tools for you to use:
1. RegEdit
2. Regedt32
3. Reg
Another tool you may wish to have is RegEditX, a free tool from DC Software (http://www.dcsoft.com) RegEditX adds extensions to
RegEdit. It does not replace RegEdit, and is not a standalone program.
What is the registry?
The registry is nothing more then a central place to store all settings on the computer. While a program doesn't have to store any data in the
registry, it's free to if it likes. It's like the configuration files for Linux and Unix, but rather then being stored in folders, it's stored in hives, a
folder-like structure.
The registry is implemented by the Configuration Manager part of the Windows Kernel.
What are the registry keys?
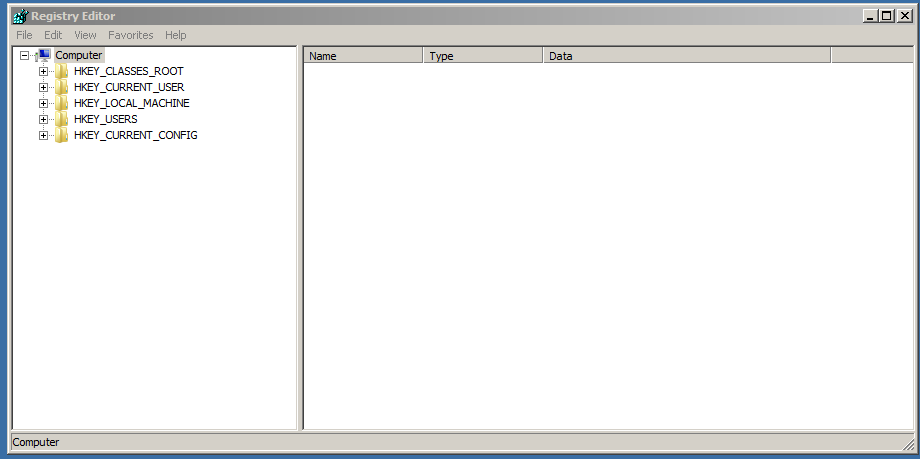
When opening the registry in RegEdit, you are presented with 5 keys, or hives. The five keys are:
HKey_Classes_Root (HKCR)
HKey_Current_User (HKCU)
HKey_Local_Machine (HKLM)
HKey_Users (HKU)
HKey_Current_Config (HKCC)
HKEY_DYN_DATA (HKDD) (Win9x Only)
Of the five, three are actually subtrees of other keys. HKey_Users and HKey_Local_Machine are the two "full" keys. The other keys are
sub keys of these two, or combinations of two or more keys. HKey_Users holds all "Per User" settings in the registry. If you make a change
to a program that records to the registry, and another user is not effect by it, then it must be in this section. You can also use this key to edit
.default, the key that is used to make the default keys for all new users. When a new user is made, .default is copied into the new hive, using
their SID to tell them apart.
HKey_Current_User is the HKey_Users key for the user running regedit. It is a shortcut to the current users settings, so you don't have to
find out what one of the HKey_Users you need to edit.
HKey_Current_Config is the current hardware profile listed in HKey_Local_Machine\System\ControllSet001\Hardware Profiles. HKCC
is nothing more then a pointer to this key.
HKey_Classes_Root is a combo of HKEY_LOCAL_MACHINE\Software\Classes and HKEY_CURRENT_USER\Software\Classes keys.
The data is a merged, so if there's no data listed for the current user, then the one for the local machine is used.
What are Keys? Hives? Values?
When most people say hives, they normally mean the five (5) main keys, but sometimes they talk about sub-keys. Keys are the ones that
look like small folders in regedit. Values for each of the keys can be binary, string, dword, multi-string ,expandable string, and a few others.
In general, you do not need to know what these values mean when editing them , since you have to use the type that value needs. You can
not use a string when a dword is called for. Strings and dwords are the most common. On windows 2K, regedit only supports string, dword
and binary. You will have to use regedt32 to edit multi and expandable strings.
The types of values in the registry are listed on by Microsoft as the following: (Note: This is taken directly from Microsoft’s site)
REG_BINARY
REG_DWORD
REG_EXPAND_SZ
REG_MULTI_SZ
REG_SZ
REG_RESOURCE_LIST
REG_RESOURCE_REQUIREMENTS_LIST
REG_FULL_RESOURCE_DESCRIPTOR
REG_NONE
REG_LINK
REG_QWORD
REG_BINARY Raw binary data. Most hardware component information is stored as binary data and is displayed in Registry Editor in
hexadecimal format.
REG_DWORD Data represented by a number that is 4 bytes long (a 32-bit integer). Many parameters for device drivers and services are
this type and are displayed in Registry Editor in binary, hexadecimal, or decimal format. Related values are DWORD_LITTLE_ENDIAN
(least significant byte is at the lowest address) and REG_DWORD_BIG_ENDIAN (least significant byte is at the highest address).
REG_EXPAND_SZ A variable-length data string. This data type includes variables that are resolved when a program or service uses the
data.
REG_MULTI_SZ A multiple string. Values that contain lists or multiple values in a form that people can read are generally this type. Entries
are separated by spaces, commas, or other marks.
REG_SZ A fixed-length text string.
REG_RESOURCE_LIST A series of nested arrays that is designed to store a resource list that is used by a hardware device driver or one of
the physical devices it controls. This data is detected and written in the \ResourceMap tree by the system and is displayed in Registry Editor
in hexadecimal format as a Binary Value.
REG_RESOURCE_REQUIREMENTS_LIST A series of nested arrays that is designed to store a device driver's list of possible hardware
resources the driver or one of the physical devices it controls can use. The system writes a subset of this list in the \ResourceMap tree. This
data is detected by the system and is displayed in Registry Editor in hexadecimal format as a Binary Value.
REG_FULL_RESOURCE_DESCRIPTOR A series of nested arrays that is designed to store a resource list that is used by a physical
hardware device. This data is detected and written in the \HardwareDescription tree by the system and is displayed in Registry Editor in
hexadecimal format as a Binary Value.
REG_NONE - Data with no particular type. This data is written to the registry by the system or applications and is displayed in Registry
Editor in hexadecimal format as a Binary Value
REG_LINK A Unicode string naming a symbolic link.
REG_QWORD Data represented by a number that is a 64-bit integer. This data is displayed in Registry Editor as a Binary Value and was
first introduced in Windows 2000.
What is group policy?
Group policy is used to ease the change of many registry settings on a Windows computer. This is generally only done on windows 2000,
XP, and 2003 or newer machines. Administrative tools should have group policy editor, listed as local policy editor. If not listed there, from
the run menu, type in mmc, and file -> Add\Remove Snap in. In the local computer policy, you have two keys, computer and user
configuration.
These change settings in HKU and HKLM. There are a fair amount of options here predefined, like computer configuration, windows
settings, startup\shutdown scripts. while called scripts, these can be .bat or .exe files ran when the computer starts up\shuts down. This is
NOT the same as log on\log off. Most normal users will want to play with the user configurations, computer configuration is more for
higher level users.
In the user section, you have options for login\logoff scripts, and administrative templates. The templates are the main thing here that users
will want to mess with. Click on desktop, and there's a listing of options. This is mostly simple stuff, hide icons or show them, nothing in
there should really be considered advanced. What options you have depends on windows version, 2K has less options then 2K3 and XP.
Lets look in system, under CTRL-ALT-DEL. There's options to control what buttons you get in ctrl-alt-del. There are all sorts of options
that you may never known you could do, like network -> network connections.
In almost every key, clicking on it will get you a dialog with three options, enable, disable, and not set. And an explain tab. Make sure you
read the explain to understand what the option does.
Group policy isn't really meant to change settings on a single computer. It's meant to change settings on hundreds, or thousands of
computers at once. In a Windows Active Directory network, you have what's called OU's. They're basically folders, and the network
administrators can put computers and users into these OU's. For example, maybe you’re in the Sales\Users OU. All people in the Sales
department are required to have the same desktop settings. The administrator makes a group policy setting, and hooks the group policy onto
Sales\Users. It now effects all users in sales. What if a user moved to Tech\Desktop Administrators? The administrator simply change what
OU the user is in, and the settings for their desktop change based on the new rules. With the group policy templates, plus security settings,
and the ability to assign permissions and programs to users and\or computers, group policy is a powerful tool. Any registry changes learned
here can be applied via group policy to effect all users in a company with a few clicks of the mouse.
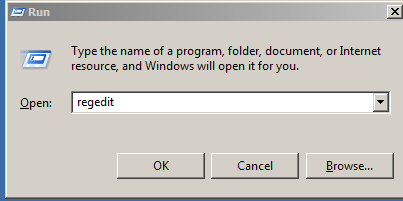
HOW DOES OPEN REGISTRY EDIT
TYPE-------------------------------
WINDOWS BUTTON + R-------------------------
Type Regedit
Sample Registry Keys
Notes: Keys with (1) and (2) need to be used together.
System Settings
Notes: The settings here apply to system-wide configurations. These settings are all applied to computers, not users.
Registered Owner
Key: HKLM\SOFTWARE\Microsoft\Windows NT\CurrentVersion
Value Name: RegisteredOwner
Value Type: REG_SZ
Set To: New Owner's Name
Notes: This key controls the Owner's name in the system tab of control panel, and in any programs that reads this data. This
has little to no effect in Windows, it's merely a cosmetic change.
Explorer Settings
Notes: All the settings here work with explorer. They should not be used for a sole means of security, as they do not remove
the rights to perform actions. They merely remove the ability to do an action via Explorer.
Disable Desktop Right Click
Key: (HKCU|HKLM)\Software\Microsoft\Windows\CurrentVersion\Policies\Explorer
Value Name: NoViewContextMenu
Value Type: REG_DWORD
Set To: 1 to enable, 0 to disable (0 Default)
Notes: Use this to disable right click context menu on the desktop.
Show Windows Version On Desktop
Key: HKCU\Control Panel\Desktop
Value Name: PaintDesktopVersion
Value Type: REG_DWORD
Set To: 1 to enable, 0 to disable (0 Default)
Notes: Displays the current Windows version on top of the desktop wallpaper.
Disable Shutdown
Key: (HKCU|HKLM)\Software\Microsoft\Windows\CurrentVersion\Policies\Explorer
Value Name: NoClose
Value Type: REG_DWORD
Set To: 1 to enable, 0 to disable (0 Default)
Notes: Removes the shutdown option from the start menu. This should be used with removal the shutdown system right. This
key does not prevent the user from turning off the computer, it only removes the shutdown button from the start menu.
Disallow These Programs From Running (1)
Key: (HKCU|HKLM)\Software\Microsoft\Windows\CurrentVersion\Policies\Explorer
Value Name: DisallowRun
Value Type: REG_DWORD
Set To: 1
Notes: This enables disallow run. Any programs later added to the DisallowRun subkey will not be ran from explorer.
Programs can still be ran by other means, and they can be renamed to bypass this.
Disallow These Programs From Running (2)
Key: (HKCU|HKLM)\Software\Microsoft\Windows\CurrentVersion\Policies\Explorer\DisallowRun
Value Name: 1+
Value Type: REG_SZ
Set To: Application's Name
Notes: This is the container for the DisallowRun. Each program should be placed in the DisallowRun key. The first program's
value should be called 1. And if the program was, for example, cmd.exe, then the string value should be cmd.exe. Renaming
files will bypass this.
Allow ONLY These Programs To Run (1)
Key: (HKCU|HKLM)\Software\Microsoft\Windows\CurrentVersion\Policies\Explorer
Value Name: RestrictRun
Value Type: REG_DWORD
Set To: 1
Notes: This enables RestrictRun. This is like Disallow Run, but explorer will only run programs listed in this key. Make sure
you enable regedit for your account, or have some other means to reverse this. This is Opt-In security.
Allow ONLY These Programs To Run (2)
Key: (HKCU|HKLM)\Software\Microsoft\Windows\CurrentVersion\Policies\Explorer\RestrictRun
Value Name: 1+
Value Type: REG_SZ
Set To: Application's Name
Notes: This is the container for the Restrict Run. Each program should be placed in the Restrict Run key. The first program's
value should be called 1. And if the program was, for example, cmd.exe, then the string value should be cmd.exe. Renaming
files will bypass this.
Shell Folders
Key: HKCU\Software\Microsoft\Windows\CurrentVersion\Explorer\Shell Folders
Value Name: Various
Value Type: REG_SZ
Set To: New Path
Notes: This key contains different paths to special folders for the user, such as desktop, CD Burning, Programs, Start Menu
and the like. I personally like to use NTFS Junctions rather then change the folder location, since some programs write to the
default location without checking for the correct value.
Application Specific
Notes: The settings here are for the listed applications only. These can be used to set options on all computers on a network
remotely, or to lock in settings by disabling the write permission to the key.
Application: Notepad
Set Font (Notepad)
Key: HKCU\Software\Microsoft\Notepad
Value Name: lfFaceName
Value Type: REG_SZ
Set To: Font name (For example: Lucida Console)
Notes: Sets the default font used in notepad.
Italics (Notepad)
Key: HKCU\Software\Microsoft\Notepad
Value Name: lfItalic
Value Type: REG_DWORD
Set To: 0 to disable, 1 to enable (default is 0)
Notes: Sets the italics for notepad.
Font Size (Notepad)
Key: HKCU\Software\Microsoft\Notepad
Value Name: iPointSize
Value Type: REG_DWORD
Set To: Desired font size.
Notes: This setting controls the font size. The value should be 10x the desired size. For example, to set a font of size 24, then
enter a decimal value of 240.
Window Size (Notepad)
Key: HKCU\Software\Microsoft\Notepad
Value Name: iWindowPosDX & iWindowPosDY
Value Type: REG_DWORD
Set To: Desired Window Size
Notes: Change these two values to control the default size of notepad when opened.
Internet Explorer
Disable ability to close browser (Internet Explorer)
Key: (HKCU|HKLM)\Software\Policies\Microsoft\Internet Explorer\Restrictions
Value Name: NoBrowserClose
Value Type: REG_DWORD
Set To: 1 to enable, 0 to disable (0 by default)
Notes: When the user presses the close button, or tries to close view the file menu, the action is denied with a message stating
"The operation has been canceled due to restrictions in effect on this computer. Please contact your system administrator" IE
can still be closed by killing the process. If this restriction is in place on a user account, and IE is ran under the context of a
different user, the first user can not kill the process of the second user. This allows internet explorer to be always active in
kiosk computers.
Remove Favorites
Key: (HKCU|HKLM)\Software\Policies\Microsoft\Internet Explorer\Restrictions
Value Name: NoFavorites
Value Type: REG_DWORD
Set To: 1 to enable, 0 to disable (0 by default)
Notes: Removes the Favorites menu from Internet Explorer.
Disable Context Menu (Right Click)
Key: (HKCU|HKLM)\Software\Policies\Microsoft\Internet Explorer\Restrictions
Value Name: NoBrowserContextMenu
Value Type: REG_DWORD
Set To: 1 to enable, 0 to disable (0 by default)
Notes: Removes the ability to right click in IE
Remove File -> Open Menu
Key: (HKCU|HKLM)Software\Policies\Microsoft\Internet Explorer\Restrictions
Value Name: NoFileOpen
Value Type: REG_DWORD
Set To: 1 to enable, 0 to disable (0 by default)
Notes: Removes the File -> Open that can be used to launch other programs. Helps keep a cleaner look in a Kiosk machine,
but NTFS permissions should still be used to limit what programs the end user may run.
Remove File -> Save As Menu
Key: (HKCU|HKLM)Software\Policies\Microsoft\Internet Explorer\Restrictions
Value Name: NoBrowserSaveAs
Value Type: REG_DWORD
Set To: 1 to enable, 0 to disable (0 by default)
Notes: Removes the File -> Save As that can be used to launch other programs. Helps keep a cleaner look in a Kiosk
machine, but NTFS permissions should still be used to limit what programs the end user may run.
Remove Address Bar
Key: HKLM\Software\Policies\Microsoft\Internet Explorer\Toolbars\Restrictions
Value Name: NoAddressBar
Value Type: REG_DWORD
Set To: 1 to enable, 0 to disable (0 by default)
Notes: By removing the address bar, and disabling Explorer, you can use a single HTML page as the computers interface on a
kiosk machine.
Automatic Update Settings
Notes: These settings allow the user to fine-tune how Automatic Updates run on a system. Most of these settings can be set
via Group Policy using default templates shipped in 2K and 2K3.
Automatic Updates
Key: HKLM\Software\Policies\Microsoft\Windows\WindowsUpdate\AU
Value Name: NoAutoUpdate
Value Type: REG_DWORD
Set To: 1 to enable, 0 to disable (0 by default)
Notes: This is the key to DISABLE auto updates. So setting it to 1 enables disable automatic updates. In other words, set it to 1
to turn off automatic updates.
Automatic Updates - Options
Key: HKLM\Software\Policies\Microsoft\Windows\WindowsUpdate\AU
Value Name: AUOptions
Value Type: REG_DWORD
Set To: 2, 3, 4, 5
Notes: These options control if it downloads the updates on it's own, or if it just tells the user when downloads are out. It also
controls if the service will install the updates, or prompt the user to install them later. 2 will tell you when there are updates to
download. 3 will download them automatically, and ask for an install. 4 will fully automate the process, but may not finish the
installs till you reboot. To use 4, you must have ScheduledInstallDay and ScheduledInstallTime set. 5 forces automatic
updates to be enabled, but allows the end users to configure it.
Automatic Updates - Install Options
Key: HKLM\Software\Policies\Microsoft\Windows\WindowsUpdate\AU
Value Name: ScheduledInstallDay
Value Type: REG_DWORD
Set To: 0~7
Notes: Controls on what day the updates will be installed. 0 is daily, while 1~7 is a set day of the week, Sunday to Saturday.
Automatic Updates - Install Options 2
Key: HKLM\Software\Policies\Microsoft\Windows\WindowsUpdate\AU
Value Name: ScheduledInstallTime
Value Type: REG_DWORD
Set To: 0~23
Notes: Controls at what time Windows will install the updates, in 24 hour format.
Automatic Updates - Auto Reboot When Logged On
Key: HKLM\Software\Policies\Microsoft\Windows\WindowsUpdate\AU
Value Name: NoAutoRebootWithLoggedOnUsers
Value Type: REG_DWORD
Set To: 0 or 1
Notes: Controls if Windows will automatically reboot when a user is logged on. Setting to 1 will prompt the user to reboot, while
setting to 0 will cause Automatic Updates to notify the user that the computer will reboot. Default time till reboot is five (5)
minutes.
TCP\IP Settings in Windows 2003
Notes: These settings are based off of Windows 2003. Some may apply to 2K and XP, and a few keys may work on 9x based
systems. But these are primarily aimed for Windows 2K3 servers. All keys listed here, plus many many more, can be found
inside the paper “Microsoft Windows Server 2003 TCP/IP Implementation Details”, listed in the references section of this paper.
Allow Raw Sockets For Users (Windows 2003)
Key: HKLM\SYSTEM\CurrentControlSet\Services\Tcpip\Parameters
Value Name: AllowUserRawAccess
Value Type: REG_DWORD
Set To: 1 to enable, 0 to disable (0 by default)
Notes: By default, only Administrators can access raw sockets on a Windows 2003 system. Setting this value to 1 allows rawsocket
usage for all users.
Arp Cache Keep Alive
Key: HKLM\SYSTEM\CurrentControlSet\Services\Tcpip\Parameters
Value Name: ArpCacheLife
Value Type: REG_DWORD
Set To: 0 to 0xFFFFFFFF (4,294,967,295 Decimal)
Notes: Controls the time, in seconds, that an entry stays within the ARP cache. Without this key, defaults are two minutes for
unused entries, and ten minutes for used entries.
Data Base Path
Key: HKLM\SYSTEM\CurrentControlSet\Services\Tcpip\Parameters
Value Name: DatabasePath
Value Type: REG_EXPAND_SZ
Set To: Path to files. (Default: %SystemRoot%\system32\drivers\etc)
Notes: This controls the path to TCP\IP's database files, Hosts, Lmhosts, Network, Protocols, Services. Sometimes changed
by malware to bypass restrictions on the hosts file.
Default Time To Live
Key: HKLM\SYSTEM\CurrentControlSet\Services\Tcpip\Parameters
Value Name: DefaultTTL
Value Type: REG_DWORD
Set To: 0~0xFF (0~255 Decimal, 128 Default)
Notes: Adjusts the TTL of outgoing IP packets. Raising TTL can cause larger broadcast storms if routing loops are formed in
network topology.
Disable Offloading to Network Card
Key: HKLM\SYSTEM\CurrentControlSet\Services\Tcpip\Parameters
Value Name: DisableTaskOffload
Value Type: REG_DWORD
Set To: 1 to enable, 0 to disable (0 by default)
Notes: Allows functions in the TCP\IP stack to be performed by the hardware in the network card. Disabling this will cause
greater load onto the CPU as the system must handle all functions. This is used for troubleshooting only.
Enable Detect Dead Gateway
Key: HKLM\SYSTEM\CurrentControlSet\Services\Tcpip\Parameters
Value Name: EnableDeadGWDetect
Value Type: REG_DWORD
Set To: 1 to enable, 0 to disable (1 by default)
Notes: This causes TCP to detect if the main gateway has went down, and will switch to any secondary gateways configured in
TCP\IP properties.
13
Enable Multicast Forwarding
Key: HKLM\SYSTEM\CurrentControlSet\Services\Tcpip\Parameters
Value Name: EnableMulticastForwarding
Value Type: REG_DWORD
Set To: 1 to enable, 0 to disable (0 by default)
Notes: This controls if the computer will forward Multicasts across other networks. This is only used when the computer is
running as a Routing and Remote Access Server (RRAS).
Enable Path MTU Discovery
Key: HKLM\SYSTEM\CurrentControlSet\Services\Tcpip\Parameters
Value Name: EnablePMTUDetect
Value Type: REG_DWORD
Set To: 1 to enable, 0 to disable (1 by default)
Notes: Controls if windows will try to discover the Maximum Transmission Unit (MTU) over the path to a remote host. If the
MTU used is larger then what is supported, then the packet will become fragmented in transport. Fragmentation can cause
network congestion and excess load on networking devices as they assemble the packets back into whole units of data.
Syn Attack Protection
Key: HKLM\SYSTEM\CurrentControlSet\Services\Tcpip\Parameters
Value Name: SynAttackProtect
Value Type: REG_DWORD
Set To: 1 to enable, 0 to disable (1 by default on Windows 2K3 with SP1, 0 by default on 2K3 with SP0)
Notes: Enables the SYN attack protection in SYN-ACK floods. Please see the Windows 2003 TCP\IP Implementation in the
References section for more information. It is recommended that it is set to 1 on all SP0 configurations, if SP1 can not be
installed for some reason.